Apple has launched its RAW photo format called ProRAW with iOS 14.3 for iPhone 12 Pro and 12 Pro Max. The new format brings the traditional benefits of shooting RAW but also includes Apple’s iPhone image processing. Follow along for why and how to use ProRAW on iPhone 12 Pro.
Apple’s ProRAW on iPhone 12 uses the universal DNG file format. If you’re not already aware, file sizes for RAW or in this case ProRAW images are much larger than HEIF/JPG compressed images. Apple says that most ProRAW images shot on iPhone 12 Pro will be about 25MB (roughly 10x larger than HEIF/JPG) but they can go up to 40MB.
The big benefit with ProRAW is you’re shooting an uncompressed image and getting as much information from the sensor to the saved photo as possible. That means you have a lot more flexibility when it comes to editing. Part of that is 12-bit color support (compared to 8-bit) which doesn’t sound like a big difference but is actually a jump from 256 RGB shades to a massive 4,096. But along with all that, you’re still getting Apple’s impressive computational photo processing.
Read more about ProRAW in my colleague Ben Lovejoy’s recent iPhone 12 Diary post and a great comparison meets why/how to post from pro photographer Austin Mann.
And for a more in-depth look:
The great part is you can use ProRAW with any of the iPhone 12 Pro/Pro Max cameras as well as using it with Smart HDR, Deep Fusion, and Night mode. And you can shoot/edit ProRAW images in Apple’s Camera/Photos app as well as third-party apps like Halide.
Keep in mind you cannot use ProRAW with Live Photos, Portrait mode, or with videos.
How to use ProRAW on iPhone 12 Pro and Pro Max cameras
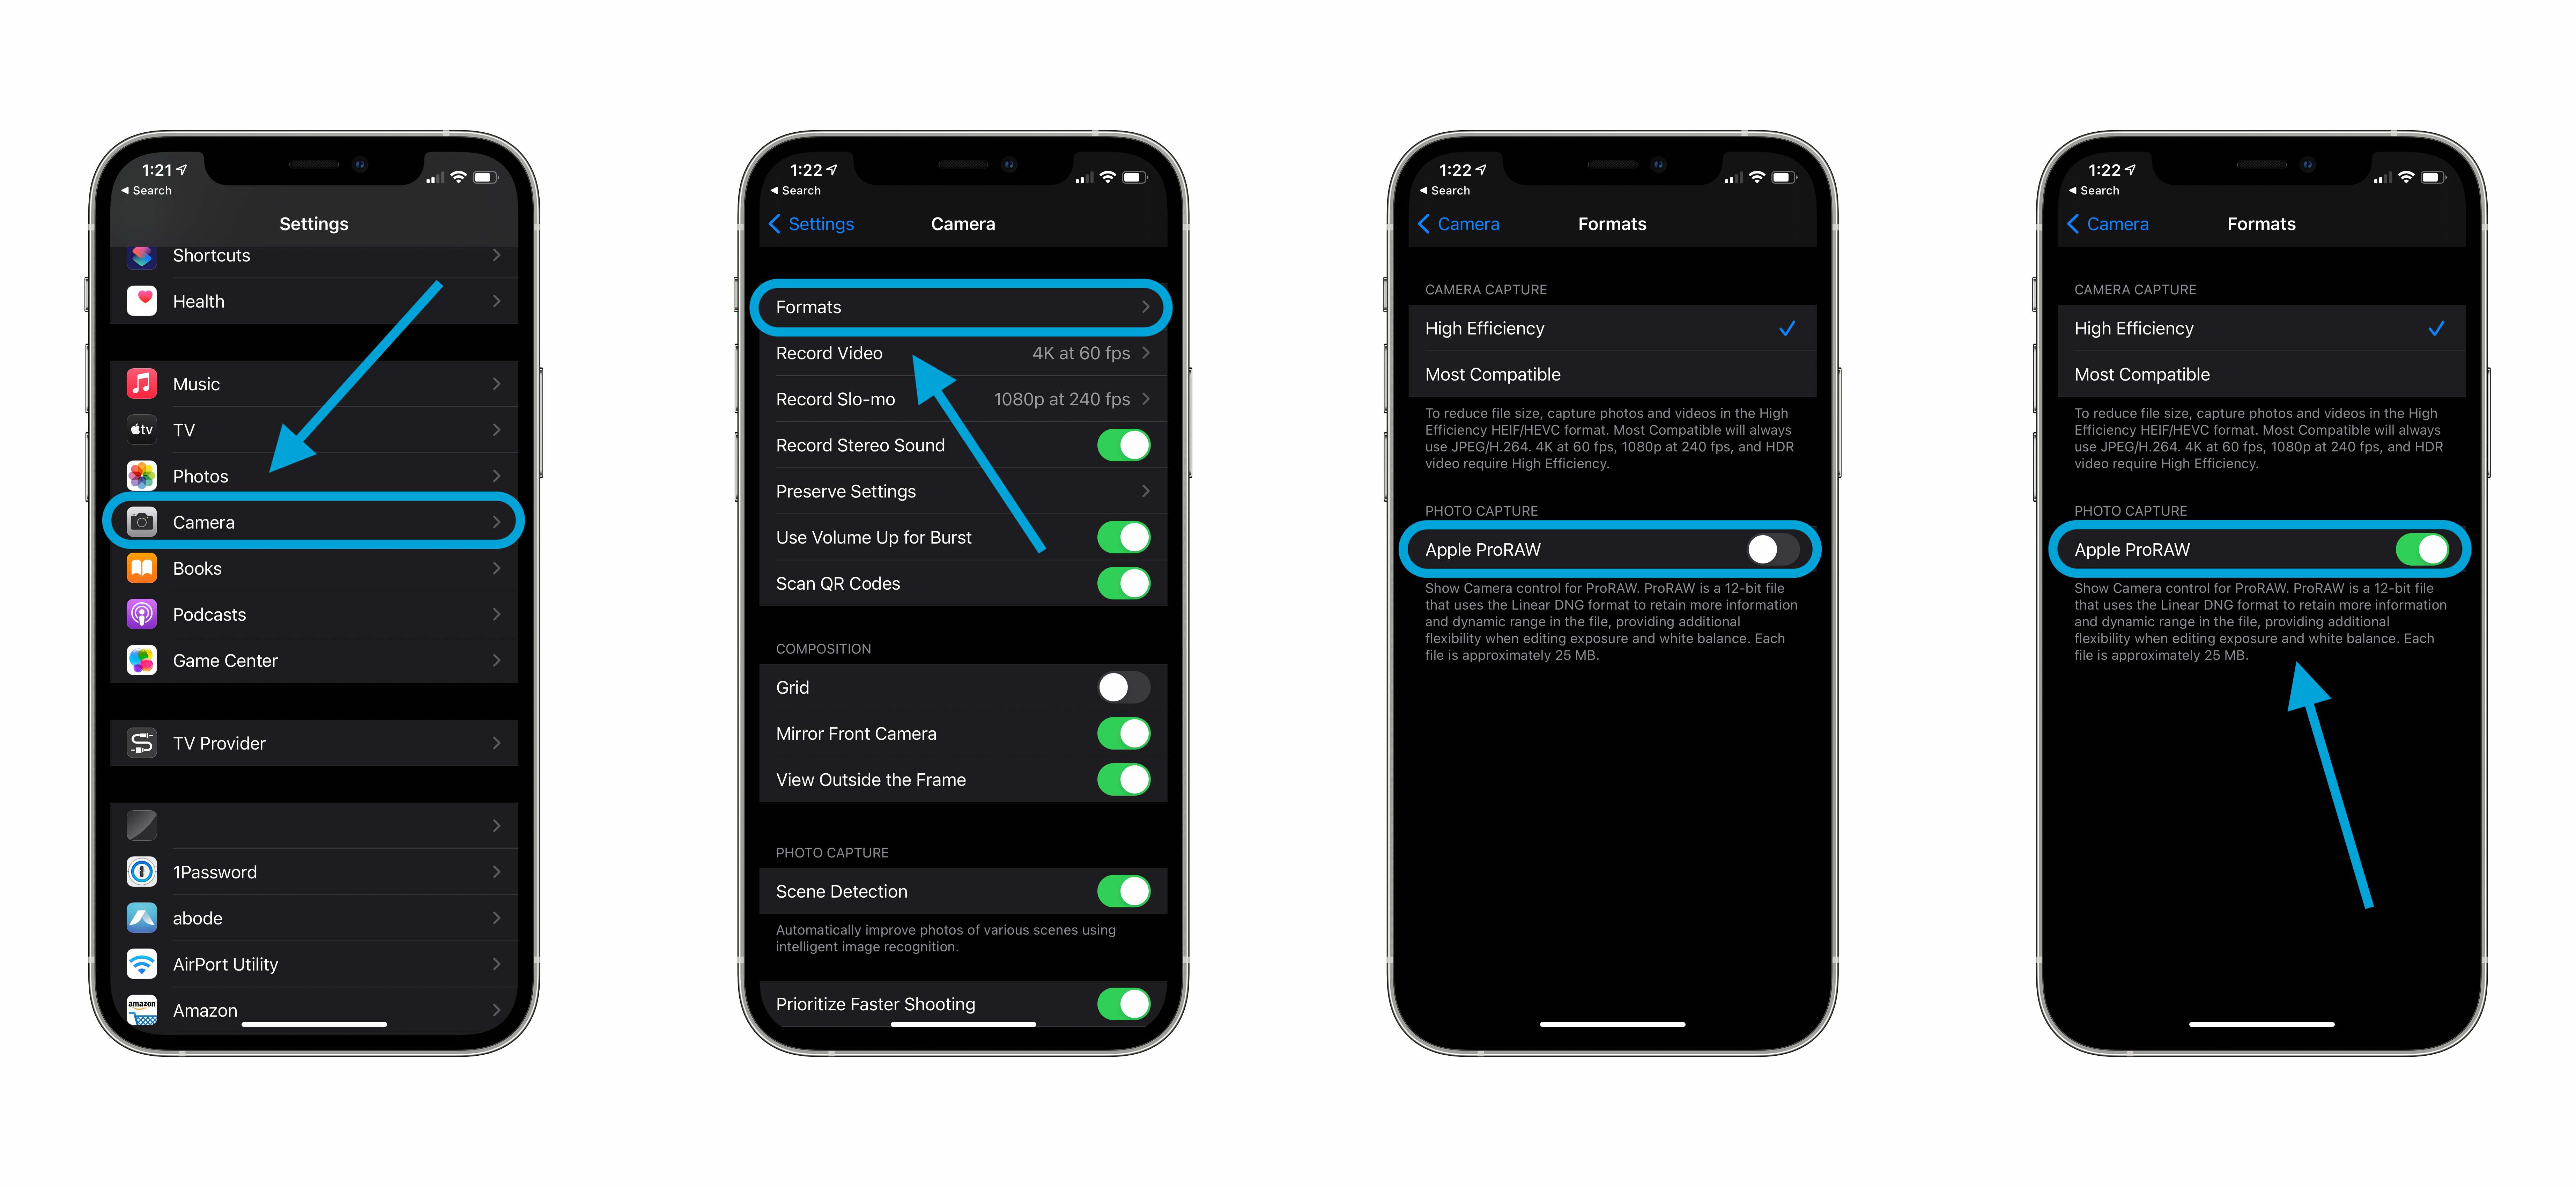
Enable ProRAW on your iPhone 12 Pro/Pro Max
- Head to Settings
- Swipe down and tap Camera
- Choose Formats at the top
- Toggle on Apple ProRAW

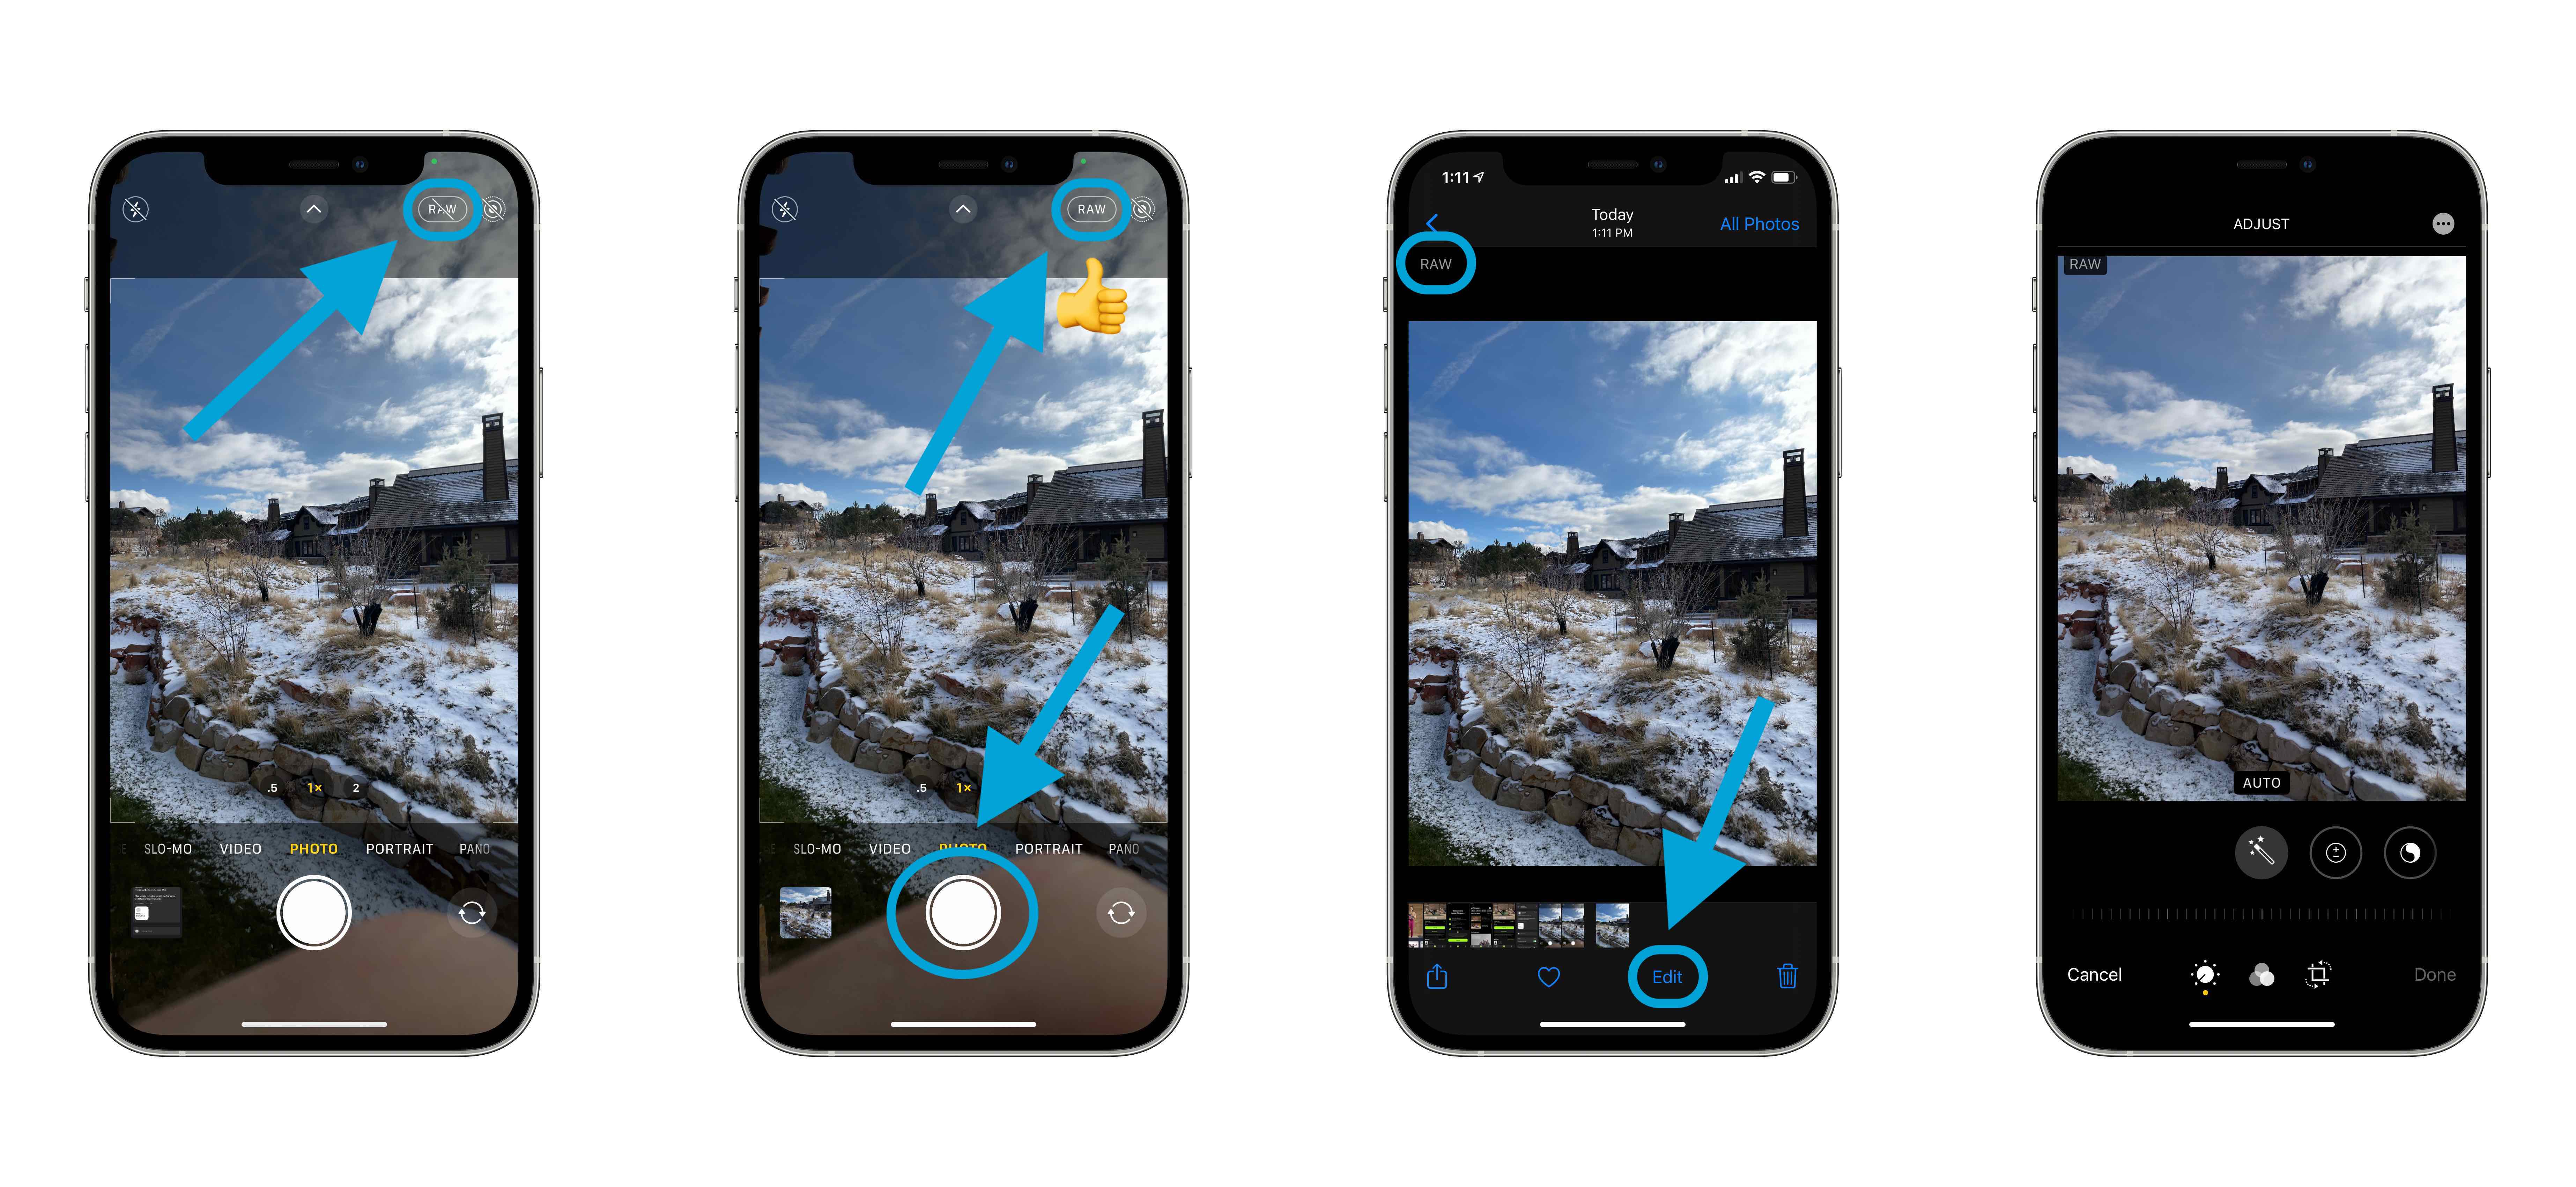
In the Camera app
- In the default iPhone Camera app you’ll now see the
RAWicon in the top right corner (top left in landscape mode) - Tap RAW to enable it for a photo, the diagonal line will disappear when it’s enabled
- After taking a photo with ProRAW, you’ll see the RAW label in the top left corner in the Photos app when looking at your images
- You can tap Edit on iPhone to immediately work with the ProRAW image
- To get ProRAW photos to sync across your devices, Apple notes you’ll need to be using iCloud Photos
- If you start shooting a lot of ProRAW images, you might need to boost your iCloud storage plan (Settings > Tap your name > iCloud > Manage Storage)

How to edit ProRAW
I leave the actual ProRAW editing advice to the pros (like Austin Mann’s great coverage here) but a few details:
- You can edit ProRAW images taken on iPhone 12 Pro and Pro Max on iPhone and iPad with iOS/iPadOS 14.3
- You can edit ProRAW on Mac starting with macOS Big Sur 11.1
- If you’re ready for more advanced editing, many like to use Adobe’s Lightroom or RAW Power
- And Halide is a top iPhone choice for more advanced controls for both shooting with ProRAW and editing
When you’re ready to dive deeper, be sure to check out this in-depth coverage from photography pros:
More
You can find more tips on using ProRAW on Apple’s support document here with details on sharing with AirDrop, emailing, and exporting original files.
FTC: We use income earning auto affiliate links. More.

Check out 9to5Mac on YouTube for more Apple news:
Article From & Read More ( How to up your photography game with ProRAW on iPhone 12 Pro and Pro Max cameras - 9to5Mac )https://ift.tt/3gQ5zOB
Technology

No comments:
Post a Comment